I admit - I like this version of the Ninja Star a lot better than my original! ;)
Okay - first off, block will measure 12.5 inches unfinished, all seams are 1/4 inch, and I pressed most of my seams open to reduce bulk.
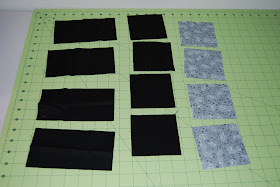
Fabric
You will need:
4 - 3 7/8 inch square blocks of print for star points
4 - 3 7/8 inch square blocks of background fabric
4 3 1/2 x 6 1/2 inch of background fabric
Start with Half Square Triangles! Match one background square to print square, right sides together. Trace a line down the diagonal on each set.
Sew 1/4 inch on each side of the marked line:
Cut down marked line:
Now you have eight sets!! Press open and trim the corners!
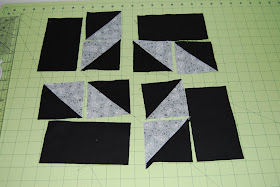
Arrange squares in this manner:
Start by sewing the half square triangles together this way:
Sew a background rectangle to each set of HST to form 4 sub-squares:
(On these, I pressed the seams toward the background rectangles.)
Now, sew two sub-squares together:
Then, finish off that square by sewing the two halves together!
TaDa!! Your very own Ninja Star!! Happy sewing everyone!
Thursday, July 14, 2011
Ninja Star - a tutorial!
I was asked to do a tutorial on the Ninja Star, so here we go!


Ha, this is very close to our next Summer Sampler block, tutorial to come on my blog tomorrow morning! So you've got a leg up on that one! : )
ReplyDeleteThanks! I am putting it on my list to do, week after next.
ReplyDeleteGreat tute Lindsay!
ReplyDelete