Thursday, June 14, 2012
Pants to Skirt - a tutorial!
Today I am going to share my semi-hack method of turning a pair of pants into a skirt! I have done this several times, and I will say honestly - these skirts are my favorites! Always really comfy!
First off - this works BEST with wide leg pants. Skinny jeans just won't work. So don't do it! :) Also, this might be a good "When you're alone" project - because you have to try it on several times throughout, and so, sewing in your undies makes it easier! lol!
The pants I used for these pictures are a pair of nice designer jeans that my husband insisted that I try (the first pair of jeans that I didn't buy at Walmart. I've come a long way in fashion...) Anyway, I loved them, but they were ultimately just a wee bit too short for my preference. (You know - I like heels, so I need long jeans!) So - what better way to keep a nice pair of jeans then to cut them up! lol! But seriously - it is a weird experience to slice into a decent pair of pants, so brace yourself, take a deep breath, and cut the INSIDE leg seam out all the way around like so...
Cut it out completely!
Now, flip them inside out and line up the front edges. Pin all the way down. Starting at a point just under the zipper (if there was one) pinch the thick seam closed, then stitch all the way down in a straight line. ***my pants were boot cut. After the Knee, I just followed the edge of the fabric.***
Trim off the extra fabric.
The front will now look like this:
There may be a bit of a pucker at the base of the zipper. It is okay. I have found that it wears well, and looks fine. Don't stress about it too much!
Now, try them on. Here, you want to - with your hand - get a feel for how far down you can sew down the back. You CANNOT sew it all the way down if you want to be able to walk. I have found that about 5 inches from the booty seam is as far as I like to go. Get an idea - then take them off, turn them inside out and pin at the point you will sew to. This will be from the base of the booty straight down. Pinch the thick seam and sew straight down, as shown.
Trim off the little triangle piece!
The back will now look like this:
Time to try it on again! :) This time to determine the desired length. Remember to add 1 inch for hem allowance, then pin at your desired length!
Cut it off!
Now, I have found that if you are going about knee length or shorter - the part you just cut off is perfect to fill in the back! Or - you can get spunky and use a contrasting fabric. I decided to use ruffle fabric!!
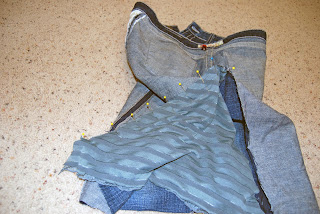
Lay your filler fabric in the opening in the back.
With a fabric marker (mine is the disappearing ink kind), trace on the filler fabric where you need to cut it **adding 1/2 inch for seam allowance!!**
Flip it all inside out, then with right sides together, pin both sides of the triangle.
Sew it! - 1/2 seam allowance here. You may also want to zigzag or surge the edges to prevent fraying.
Here we are so far! Now trim off any pieces that are hanging down below the end of the skirt.
Now, it's time to hem it up! Press 1/2 inch, then another 1/2 inch to create a beautiful hem! Pin, then stitch all the way around! **I did not hem the ruffle fabric part, as it is a knit and won't fray. If you use the leftover denim or other fabric, DO hem it all the way around!
And now, you are done!!! Congratulations!!
Enjoy your new skirt! Thanks for sewing with me!
**also, please let me know if any part of this tutorial is unclear! I would be happy to edit as needed!! Happy stitching!**
Labels:
pants to skirt,
Skirts,
tutorials
Subscribe to:
Post Comments (Atom)


4 comments:
So cute! I love the ruffle. :)
The ruffle fabric makes it so cute!!
This is so cute Linz!!! Great tutorial!!
Cuteness. We used to do this in the hippie days (yup, the 1970s), but filled in both the front and back V's with fabric, making it more of a flared skirt.
Fun to see this version!
Elizabeth E.
who is catching up on her blog reading after being gone for a while.
(Gee, you've been productive!)
Post a Comment