Wednesday, June 20, 2012

WIP Wednesday

This... is going to be short! lol! Summer continues to be packed to the rafters, and sewing time is suffering as a result! I have done just a few little things...

Pants to Skirt

My tutorial is up! Look for it HERE! It's a fun one!


Skill Builders Sampler

I am working through the Surveyor's Compass. It's hard. Really Hard.


Next I have a feathered star which looks wildly difficult, so wish me luck! These last few are killer! :)

6 point star tutorial


Look for this one tomorrow!! Yay!

Beejeebers

This is our block for June for Erica! It was super fun!! The Tutorial can be found HERE!


That's it! Be sure to check out all the awesome WIPs over at Freshly Pieced! Today WIP Wednesday is hosted by Sukie!! So fun!

WIP Wednesday at Freshly Pieced

Thursday, June 14, 2012

Pants to Skirt - a tutorial!


Today I am going to share my semi-hack method of turning a pair of pants into a skirt! I have done this several times, and I will say honestly - these skirts are my favorites! Always really comfy!

First off - this works BEST with wide leg pants. Skinny jeans just won't work. So don't do it! :) Also, this might be a good "When you're alone" project - because you have to try it on several times throughout, and so, sewing in your undies makes it easier! lol!

The pants I used for these pictures are a pair of nice designer jeans that my husband insisted that I try (the first pair of jeans that I didn't buy at Walmart. I've come a long way in fashion...) Anyway, I loved them, but they were ultimately just a wee bit too short for my preference. (You know - I like heels, so I need long jeans!) So - what better way to keep a nice pair of jeans then to cut them up! lol! But seriously - it is a weird experience to slice into a decent pair of pants, so brace yourself, take a deep breath, and cut the INSIDE leg seam out all the way around like so...


Cut it out completely!

Now, flip them inside out and line up the front edges. Pin all the way down. Starting at a point just under the zipper (if there was one) pinch the thick seam closed, then stitch all the way down in a straight line. ***my pants were boot cut. After the Knee, I just followed the edge of the fabric.***


Trim off the extra fabric.


The front will now look like this:


 There may be a bit of a pucker at the base of the zipper. It is okay. I have found that it wears well, and looks fine. Don't stress about it too much!

Now, try them on. Here, you want to - with your hand - get a feel for how far down you can sew down the back. You CANNOT sew it all the way down if you want to be able to walk. I have found that about 5 inches from the booty seam is as far as I like to go. Get an idea - then take them off, turn them inside out and pin at the point you will sew to. This will be from the base of the booty straight down. Pinch the thick seam and sew straight down, as shown.


Trim off the little triangle piece!


The back will now look like this:


Time to try it on again! :) This time to determine the desired length. Remember to add 1 inch for hem allowance, then pin at your desired length!


Cut it off!


Now, I have found that if you are going about knee length or shorter - the part you just cut off is perfect to fill in the back! Or - you can get spunky and use a contrasting fabric. I decided to use ruffle fabric!!

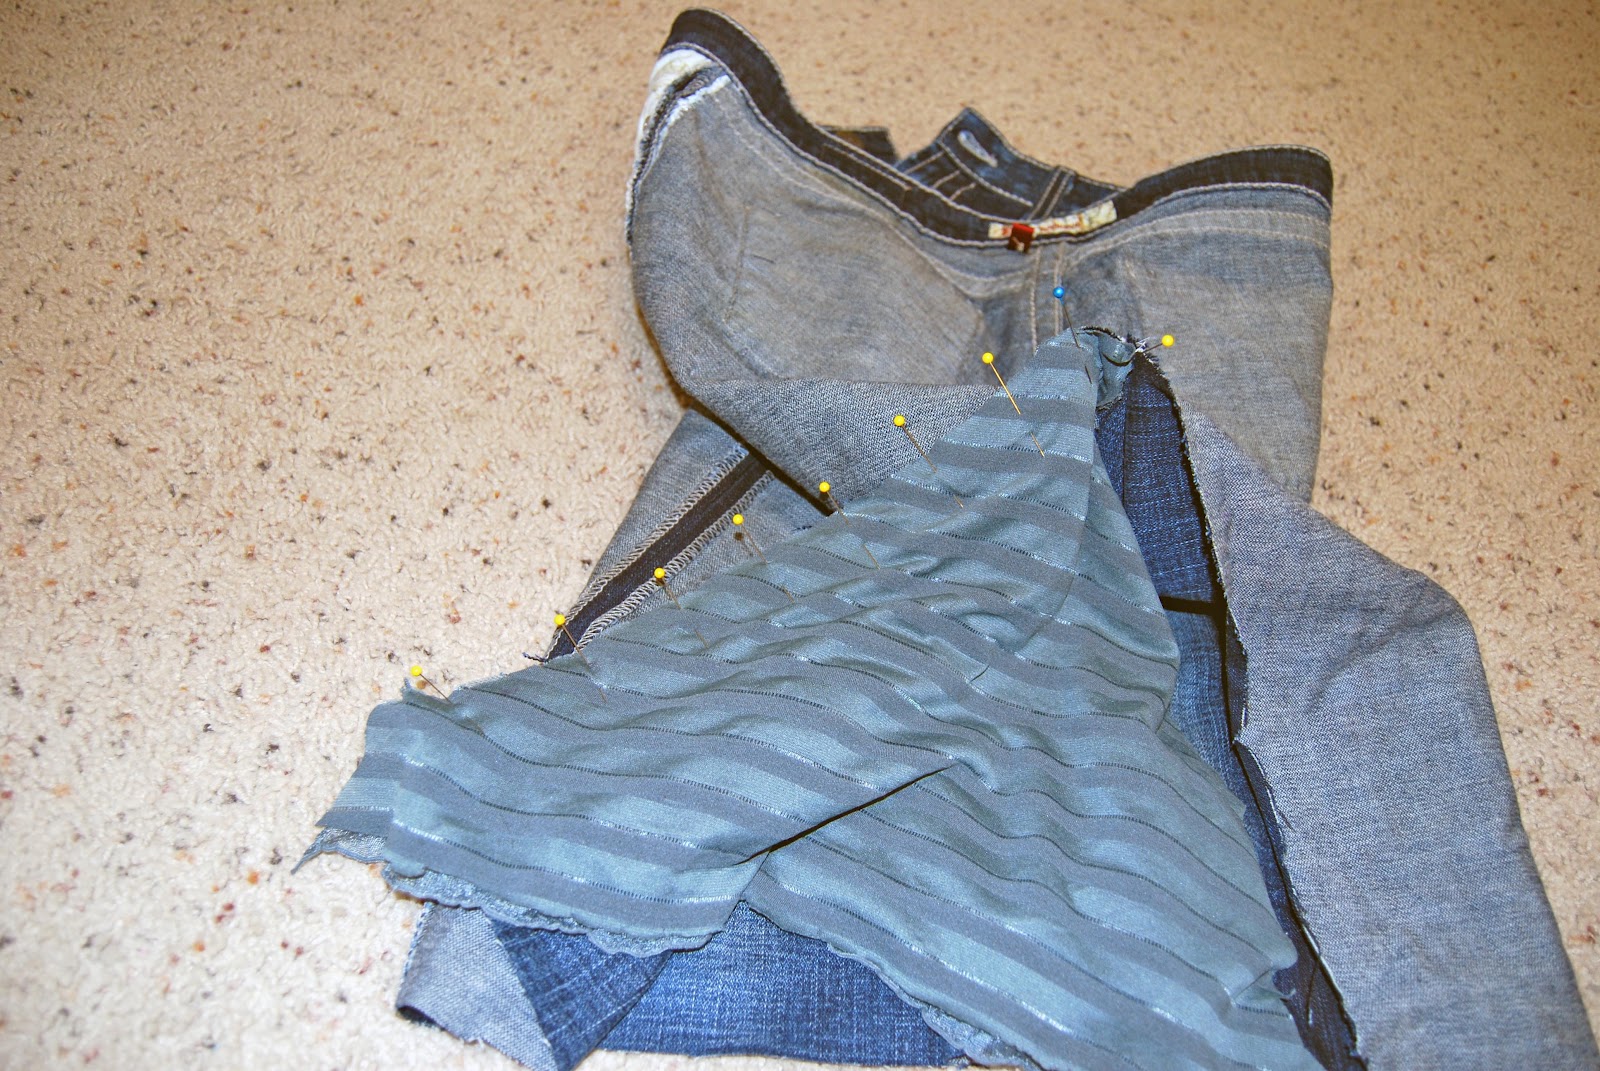
Lay your filler fabric in the opening in the back.


With a fabric marker (mine is the disappearing ink kind), trace on the filler fabric where you need to cut it **adding 1/2 inch for seam allowance!!**


Flip it all inside out, then with right sides together, pin both sides of the triangle.


Sew it! - 1/2 seam allowance here. You may also want to zigzag or surge the edges to prevent fraying.


Here we are so far! Now trim off any pieces that are hanging down below the end of the skirt.


Now, it's time to hem it up! Press 1/2 inch, then another 1/2 inch to create a beautiful hem! Pin, then stitch all the way around! **I did not hem the ruffle fabric part, as it is a knit and won't fray. If you use the leftover denim or other fabric, DO hem it all the way around!


And now, you are done!!! Congratulations!!


Enjoy your new skirt! Thanks for sewing with me!

**also, please let me know if any part of this tutorial is unclear! I would be happy to edit as needed!! Happy stitching!**

Wednesday, June 13, 2012

WIP on Wednesday!

Wow! I can't believe it's Wednesday again! I have done very little this week, sewing wise. Somehow I am only just barely keeping up with Summer activities! Yikes!! But here is what I have done:

A new tutorial: Pants to Skirt

I have put together a really fun re purposing tutorial on how to change a pair of pants into a cute skirt! I am planning to post this tomorrow, so stay tuned!

Another Tutorial: 6 Point Star, Diamond/Y seam tutorial

I have this tutorial coming up too, but I need to retake a few pictures... which of course means doing it all over. hahaha! Watch for this one next week!

Skill Builder Sampler: Mini Lone Star

This one is killing me. I don't know why. I've done it twice. Here's the first one:


It's a hot mess. None of my seams would match up, it won't lie flat, it's about an inch too small... mess. So, I redid it:


Better. Still have seam matching trouble, but it's better. I still had trouble with the center wanting to bunch up. It's now about 1/2 inch too small. I have an idea to make it work for real, so... I will be doing it a third time. lol!!

Then, I will be moving on to this week's paper piecing block of awesome: a compass block! I am really excited to try it!!

Well, that's all! Be sure to check out all of the WIPs over at Freshly Pieced!!

Thursday, June 7, 2012

OSU Quilt Complete

The OSU Father's Day Quilt is all done! Yay!! I am so so thrilled with how it turned out, and I am sure my dear friend's husband will love it!

Here it is!!


I'm not sure if it's just my computer, but from where I sit, the colors in the pictures are really bright. The orange is in reality a lovely sort of pumpkin orange. Anyway, I love this pattern!!


I backed it in a nice plaid flannel that matches wonderfully. It will be very snugly!! I wanted to add something to the back that would help with orienting the quilt the right way (remember my hubby's manly advice? lol!) but, the backing was big enough without a stripe. So, after perusing the Oregon State website, I found one of their sayings that made me smile and appliqued that on the back!


I love it! I even used the college's font of choice! I hope this detail makes him smile! :)


All in all - a wonderful project! I really hope he likes it!

Stats:
Pattern: Easy Going Modern By Felicity Quilts
Size: 60 x 80
Fabrics: various
Quilting: by me - meandering stipple, FMQ

Lastly - it is Thursday, and I did to something new on this quilt! I had heard of this little technique a while back, but never tried it. I decided to give it a try on this one. The idea: zigzagging the edges just prior to stitching down the binding. The tip said that this would keep the edges flat and make doing the binding easier. I was a sceptic. And at first, as I was zigzagging, it felt like a waste of thread. But I persevered and gave it a fair shot.


My thoughts - it really does help. It made things more uniform, and the finished product looks great. I don't know if I would do this every time, but it is a good tip and I would do it again! SO here's to trying something new!!

Wednesday, June 6, 2012

WIP Wednesday!!

Another Wednesday is here! I feel like life's pace picked up about 3 notches this summer! lol! But I do have some things to share!!

OSU Father's Day quilt!


It's done!! I just need to get it mailed off! YAY!! Watch for pictures tomorrow!! :)

Skill Builders Sampler

I am in danger of getting behind again, but this (well, last) week's block is super cool!

Mini Lone Star
Block by Leila

Mini Lone Star! I can't wait to do this one! It looks awesome! :)

Beejeebers

Our June block is so cool. I still have to do it, but here's a look at the inspiration blocks from Oh, Fransson!


So cute!! In blues, greys, and greens!  am looking forward to getting started!

Also, I am starting to plan how I will put together my game night quilt, and how the back will be!! I am so excited!!!

A new Tutorial

I have taken pictures for a new tutorial that is super fun!! Watch for it soon! It's a repurposing tute = Pants to Skirt!! I am thrilled to share it in the next few days!!

So, there we are! Be sure to check out all of the WIPs over at Freshly Pieced!

Monday, June 4, 2012

Bella Patchwork Wedding Quilt Finish!

I had a second marvelous finish last week! A quilt made with the Bella Patchwork pattern, by the ever lovely Elizabeth D!

I am blessed to have a quilting neighbor. This was the first time we've actually done a quilt together, but it will definitely not be the last! We had a blast tag teaming this quilt! To my awesome neighbor and friend, Shelley - Thank you! This was such a fun project to do together! Shopping for fabric was the funnest! :)

Anyway, we made this quilt as a wedding gift for a mutual friend. I hope that they love it! So, here it is - Bella Patchwork in shades of grey and yellow!!


The backing is an awesome grey flannel - perfect for snuggling! And I love the sashing we added! I think this one is a real winner!

Stats: Size: generous throw size about 66 x 80
Pieced by: Me and Shelley S.
Fabrics: various prints and solids. I don't know the lines. Also, I don't know if you can see it in the pictures, but the yellow and white both have this beautiful herringbone print that I couldn't get enough of!! Awesome!
Quilting: by me, meandering stipple, FMQ

Wonderful pattern and project!! I sure hope the newlyweds love it!! :)

Friday, June 1, 2012

TGIFF - King Size Edition!

I am so so so thrilled to do this post today!!!! I have a King Size finish to share with you today! YEA!!!
 
 
E's King Size Zig Zag Quilt!

I am so thrilled to have finally finished this one! It was a long road! I started this quilt in November. 6 months is the longest I've ever taken on a quilt, by far, but I am so glad that I took my time on this one! I learned so much through this process - perfecting HSTs, making perfect points on Chevrons, LONG ARM QUILTING!! Yes, this has been a wonderful project! And I am so happy that it is going to someone who I just love and  I know will appreciate it!

So, here she is - the gigantic Zig Zag Quilt:


Stats:
Fabrics: various prints from several collections
Backing: an Egyptian cotton sheet that is super soft and totally beautiful
Quilting: long arm quilted by ME with a lovely swirly design
Size: huge. 92 x 107

I am so happy with this quilt. YEA for finishing the longest WIP I've had!! :)

Linking up to TGIFF at Quokka Quilts!!